METAL WORKS AND WELDING (TLE 70)

Posted by Roger Joey On Tuesday, July 20, 2010 0 comments


Metalworking

- is the process of working with metals to create individual parts, assemblies, or large scale structures. The term covers a wide range of work from large ships and bridges to precise engine parts and delicate jewellery. It therefore includes a correspondingly wide range of skills, processes, and tools.


Welding

- is a fabrication or sculptural process that joins materials, usually metals or thermoplastics, by causing coalescence. This is often done by melting the workpieces and adding a filler material to form a pool of molten material (the weld pool) that cools to become a strong joint, with pressure sometimes used in conjunction with heat, or by itself, to produce the weld. This is in contrast with soldering and brazing, which involve melting a lower-melting-point material between the workpieces to form a bond between them, without melting the workpieces.


I PICK IT!!

DUST PAN METAL


Tools and Materials Needed;


1.plain sheets(metal)

2.rivets

3.hammer

4.pattern paper

5.driller

6.wood

7.scissor metal cutter

8.pencil or marker

9.measuring tools

10.cutting tools


Procedures:

1.Prepare all the materials needed.

2.Start your work first by making a pattern paper, which is needed to in tracing.

3.After creating your pattern, trace it to the plain sheets and cut it by the use of scissor metal cutter.

4.Use driller in making holes.

5.After using the driller, start placing the rivets by the use of hammer.

6.To form dust pan, fold/bind all the edges of the plain sheet.

7.Finally, attach the handle.


Reasons why I pick this one as my Best Project?

During finals we are require to submit two projects. It includes the dust pan metal and alcohol lamp. This two projects is our requirements in finals. Compared to other projects in other major subjects, metal works project is more easier and the materials are not too expensive that's why I be able to buy the materials needed and submit my project on time.

Laboratory Picture's


BASIC ELECTRONICS (TLE90)

Posted by Roger Joey On 0 comments

BASIC ELECTRONICS


Basic electronics - comprises the minimal "electronics components" that make up a part of everyday electronics equipment. These electronic components include resistors, transistors, capacitors, diodes, inductors and transformers.


Powered by a battery, they are designed to work under certain physics laws and principles. Basic electronics also concerns the measurement of voltage, current (electron flow) and resistance in the assembled working "circuit."


I PICK IT!!


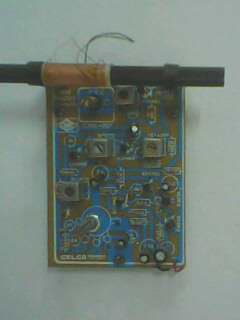
“SUPER HETERODYNE RECIEVER”


Tools and Materials Needed:

1.AM Kit

2.Soldering Iron

3.Soldering Led

4.Wire

5.Bolts and knots

6.Batter Board

7.Wood

8.Power Supply Kit

9.Speaker (4ohms)

10.Screw Driver

11.Cutter

12.Hacksaw

13.Cover

14.Nail

15.Cord


Procedures:

1.Prepare all the tools and materials needed.

2.Start first your work by, assembling the two kits, respectively the AM Receiver
Kit and Power Supply Kit.

3.Use soldering led and soldering iron in assembling the Kits.

4.Make it sure that those parts on the Kits are place on their exact location, in order to avoid error in assembling.

5.After, assembling the two kits, check first the full wave power supply if it can carry the voltage of the am receiver.

6.At the same time, check your AM kit by the use of the multi-tester and voltage from the power supply.

7.Connect it to the speaker, if the speaker will oscillate, it means that you are successful on your work.

8.Start attaching it to the batter board prepared. And then your done!!!


Finish Project"


Reasons why I pick this one as my Best Project?


Electronics was a challenging major base on my experience. At first, I find it boring during lectures because I can't relate to the discussion. But, when it reaches in the middle of learning I'm starting to get interested on the subject. This is the first time, I committed to escape from the class in order to buy the materials needed for our laboratory shop. Although, I didn't attend the class I was very thankful because our instructor did not check our attendance. To the project, it is very expensive and challenging, it requires a lot of effort, knowledge about the project and patience.


Documentations"


BASIC ELECTRICITY (TLE80)

Posted by Roger Joey On 0 comments


BASIC ELECTRICITY


Basic electricity

- is described in many ways. When an electric circuit flows through a conductor, a magnetic field (or "flux") develops around the conductor. The highest flux density occurs when the conductor is formed into a coil having many turns.

In electronics and basic electricity, a coil is usually known as an inductor. If a steady DC current is run through the coil, you would have an electromagnet - a device with the properties of a conventional magnet, except you can turn it on or off by placing a switch in the circuit.


I PICK IT!! My Best Project


CIRCUIT CONNECTIONS'


1.Series Circuits

A Series circuit is a circuit where there is only one path from the source through all of the loads and back to the source. This means that all of the current in the circuit must flow through all of the loads.


2.Parallel circuit

A Parallel circuit has more than one resistor (anything that uses electricity to do work) and gets its name from having multiple (parallel) paths to move along . Charges can move through any of several paths. If one of the items in the circuit is broken then no charge will move through that path, but other paths will continue to have charges flow through them.


3. Simple Circuit


A simple circuit contains the minimum things needed to have a functioning electric circuit. A simple circuit requires three (3) things:

1.A source of electrical potential difference or voltage. (typically a battery or electrical outlet)

2.A conductive path which would allow for the movement of charges. (typically made of wire)

3.An electrical resistance (resistor) which is loosely defined as any object that uses electricity to do work. (a light bulb, electric motor, heating element, speaker, etc.)

4. Series-Parallel Circuit

A Series – Parallel connection is combination of the two electrical connections, compose of many connections, whether parallel or series.


Reasons why I pick this one as my Best Project?

Electricity is one of the major subject i will never forget. Because, our classroom was located in the Information Technology Building, which is not our department. It's the first time that as Education students we are assign in a room which is not supposed to be happen. The thing I will never forget was our instructors from both laboratory and lecture teachers. I didn't find hard doing our project because I find it easy and understand the project because it is explained will by our teachers.


Laboratory Picture's


ARCHITECTUTAL DRAFTING ( TLE 30 )

Posted by Roger Joey On 0 comments


ARCHITECTUTAL DRAFTING


DRAFTING


– is the art of making lettering and mechanical and freehand drawings for technical documents, school reports, and professional papers. It is used extensively by architects, engineers, artists, and other professional who work with visual presentations.


I PICK IT!!


Orthographic and Isometric Drawings


Orthographic projection - is the method of depicting the exact shape of the object by breaking it up into two or more views.


PROCEDURES:

How to Draw an Orthographic Projection

1.Study the general as well as the distinct features of the object or article.

2.View the object from the from the front, top, and right side.

3.Fix your eye on the front view.

4.Find the maximum length, depth, and width.

5.Draw an outline (in every light lines) using the information in # 4.

6.Fill in the details in the front view first.

7.Fill in the top view and the right side view simultaneously.

8.Give the drawing dimensions.


Isometric projection - is a drawing of an objects three sides or views seen at the same time. It therefore gives an excellent pictorial view.
PROCEDURES:

How to Draw an Isometric Projection

1.Sketch horizontal line XY.

2.Sketch line AB perpendicular to line XY so that 90 degree angles are formed.

3.From line AX, mark the point of a 30 degree angle (point C). from line AY, mark the point of a 30 degree angle (point D).

4.Connect points A and C on one side, and points A and D on the other side with lines.

5.Draw a line parallel to line AC from point B. Then from point C, draw line parallel to line AB. Mark the point at which the two lines point meet E. On the other side, draw a line parallel to line AD from point B. Then draw a line parallel to line AB from point D. Mark the point at which the two lines met point F.

6.Draw the line parallel to line EB from point F. Then draw the line parallel to line BF to point E.


Reasons why I pick this one as my Best Project?


I really hate drawing honestly. But, I have no choice because this Architectural Drafting is part of our curriculum. I pick this orthographic and isometric drawing because, I don't really expected that someone will help me. I was really pressure and so stress at that moment when we are having this activity but thank God somebody help me and fortunately I got a good grade.


Our Drawing Room....


GRAPHIC SCIENCE AND ARTS (TLE 50)

Posted by Roger Joey On 0 comments


GRAPHIC SCIENCE AND ARTS

Graphic Art's

-is to the art of printmaking and drawing. In contemporary usage it refers to the applied trade-skills of a pressman, pre-press technician, or typesetter.
-The term can include the trades of lithography,serigraphyand bindery, among others. Graphic arts as a trade can be traced back to the first instances of the stamped image or word.


I PICK IT.... My Best Project


Bookbinding


- is the process of physically assembling a book from a number of folded or unfolded sheets of paper or other material. It usually involves attaching covers to the resulting text-block.


Two Types of Bookbinding:

1.Hard Cover
2.Soft Cover


Materials Required

Sheets of paper (depending upon the size of the book)

Piece of cardboard

Wallpaper, contact paper, felt or cotton fabric

Paper cutter

A pair of scissors

White glue or wallpaper paste

Needle with a large eye

Twine, carpet thread, crochet thread or quilting thread.


Procedure:


For the Book

Determine the size of the book that you require. Fold the sheets midway. If you want a book of 5 1/2″ x 9″ dimensions use sheets of paper having dimensions of 11″ x 18″ as folding them midway will give you pages of the desired size. Each side of a folded sheet of paper will give four pages. Hence divide the number of pages you want to have for your book by 4. Use one sheet extra than the number that you get.

This extra sheet will serve as the first and the last page onto which the cover will be pasted. Place all the sheets on top of each other. Fold them midway. Clip all the four edges to hold the sheets in place. You can also clip the center of the fold. Beginning ½ '' from the top of the fold, start marking for holes at regular intervals.
For the Cover

Cut two cardboard pieces in the shape of the book. These pieces could be the same size or a little larger than the book's dimensions. Place the two pieces on the felt, cloth or the material you are using to cover the cardboard pieces such that there is a gap of 1/8″ to 1/4″ between them. Draw the outline of the cardboard pieces on the material with a pencil. Remove the cardboard pieces. Now cut the material one inch around the entire outside of the pencil mark.
Apply glue to the cardboard pieces and place them along the pencil mark. Apply glue to the one inch of extra material along the border of the cardboard pieces. Fold in the four corners so that the tip of the corners of the material lies on the diagonal of the cardboard piece. Now fold in the material along the sides of the cardboard. Let the cover dry. Apply glue to the outer sides of the first and the last page of the book. Place the book carefully along the center of the two cardboard pieces and smooth down. Close the book and place some weight over it.


Reasons why I pick this one as my Best Project?

- I choose Book binding as my best project, because although this project is expensive because of the materials needed and including the tools, still after I have finish my project I was totally amazed because the hard bond and the soft bond I have made is very attractive to look out. And I realized, that in order to achieve a nice work you need a lot of sacrifices. The book bond's I have made is I use it as my notebook in second semester.


Sample Picture's


FISHERY ARTS ( TLE 21 )

Posted by Roger Joey On 0 comments


FISHERY ARTS ( TLE 21 )


Fisheries

– science which deals with the study, utilization, conservation of fish and other fishery products and their fishing ground and the right to use such product.


Fishery

– act for the business of catchery, culturing, preserving fish and other fishery products.


Factors to be considered prior to Fishpond Construction:

1.Topography (area)

2.Water Supply

3.Soil

4.Free From Flood

5.Vegetation

6.Nearness To Market

7.Accessibility To Transportation


I pick it....My Best Project..


Pond Preparation


Procedures:


Cleaning and leveling

Purpose:
1.to facilitate easy draining of water.
2.to eliminate aquatic weeds.

Cultivation of pond soil.

Draining and drying.

Apply organic fertilizer at the rate of 500 kg/ha depending upon the fertility of the soil.

Let in water at the rate of 10 cm barely covering (3-5 days) the pond surface.

Increase water depth to 20 cm.

Apply inorganic fertilizer at the rate of 10 kg.

3-5 days after observing of their signs of growing natural fish food.

Depth of water during culturing period should be 75 cm to 1m.


Why I pick this one as my Best Project


- I choose this fishpond construction as my best project, because compared by the other project which is culturing fish, this fishpond construction is more challenging although you need to sacrifice time and exert effort but still its enjoyable, most especially if you will do it together with your friends and classmates.


Sample Pond”


AGRICULTURAL ARTS ( TLE 20)

Posted by Roger Joey On 0 comments


AGRICULTURAL ARTS


Agriculture

- Agriculture is the life support system of some economies. It answers the peoples basic need for food and nourishment. Agriculture covers a wide spectrum of food production, plant production, animal raising and fisheries. The Filipino people with preservance and hard work, has provided the country with bountiful harvests from its many productive lands and waters.


I PICK IT... My Best Project...


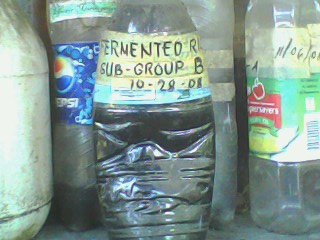
Effective Microorganisms Extended


Objective :

- to be able to produce Effective Microorganisms Extended


Materials:
45 ml EM 45 ml Molasses 1 liter mineral H20 or non-chloride water 1 liter empty mineral water plastic bottle Permanent marker Paper tape for label calibrated measuring cup 1 T – 15 ml to 3T = 45 ml


Procedures:


Calibrate 1 liter bottle 3T = 45 ml of H20 and mark the level.

Pour the 45 ml molasses directly into the bottle, pour/ dilute it with about 200 ml H20 into the bottle.
Gently shake the 45 ml molasses with 200 ml h20 (unchlorinated).

Take care not to aggravate the solution, avoid creating foam.

Add 45 ml EM, and the rest of the water.

Fill to the shoulder of the bottle. Allow some head space for fermentation to take place.

Open the cap or cover of the bottle to allow the gas out every morning and close again.


Let the moisture ferment for one week to allow the effective microorganisms to multiply.


My Finish Product....


Why I pick this one as my Best Project...

- Effective Microorganisms Extended is one of the most memorable activity in agriculture. Because, this is the first time I experienced doing a different mixtures. Aside, from that this EME has a big contribution in our garden, because it helps our plant to grow healthy and grow faster. We also use this EME in our research, because this EME is one of the mixture needed in bokashi making.


Laboratory Output's


About this blog

Followers

About Me

My photo
....nice person!! ....just know me in person..

Subscribe to our feed

Powered by Blogger.